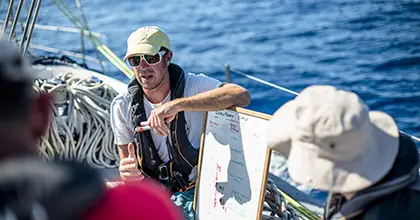


Welcome to our Rubicon 3’s guide to the essential boating knots, hitches and bends. Throughout history, they have been an essential part of human civilization, enabling the construction of shelters, the sailing of ships, and the exploration of unknown territories. This fascinating craft, which dates back to prehistoric times, has evolved through the ages, embodying humankind’s ingenuity and survival instincts. Mariners, climbers, scouts, and artisans have passed down their knowledge of knots and hitches from one generation to the next, making it a rich heritage of practical skills that remain vital to a modern-day sailor. Whether bending a sheet onto a sail, hoisting a flag, or tying a mooring line, the ability to tie the right knot, bend, or hitch is essential.
Knot Just a Twist: Exploring the Unique Roles of Bends, Knots, and Hitches!
Understanding the distinctions between nautical knots, bends and hitches is important to using them correctly. Bends are specialized knots designed to join two ropes together, focusing on creating a strong and often reversible connection. Knots, in a broader sense, manipulate the rope into loops, stoppers, or bindings to serve a wide range of purposes, from securing objects to creating attachment points. Hitches, by contrast, are knots tied to a fixed object such as posts, poles, or other ropes, relying on the object for their stability and often used for temporary fastening or tensioning tasks. Each serves a unique function: bends for rope extension, knots for rope modification, and hitches for rope attachment.
How knots affect breaking strain in rope
When a knot is tied in a rope, it invariably alters the rope’s natural straight alignment, introducing bends and twists that concentrate stress in specific areas. This concentration of stress results in a reduction of the rope’s overall breaking strain, or tensile strength. The degree of reduction can vary widely, depending on the type of knot, the material of the rope, and how the knot compresses and bends the fibers or strands. Knots create localized points of friction and tension, which can weaken the rope’s structure and reduce its ability to bear load evenly. While some knots, like the bowline, are designed to minimize this impact, nearly all knots will decrease a rope’s maximum load-bearing capacity to some extent. This reduction can range from 10% to over 50% of the rope’s original strength, making it crucial to consider the choice of knot in relation to the intended use and required strength of the rope.
The essential knots, bends and hitches
The eight most important knots, bends and hitches for sailing each serve specific purposes, from securing the boat to adjusting the sails.
- Bowline – Used to form a fixed loop at the end of a line, ideal for attaching a jib sheet to the clew of the sail.
- Clove Hitch – Useful for attaching a line to a post, piling, or another rope. It’s quick to tie and untie, making it handy for temporary moorings or fender lines.
- Square Knot (Reef Knot) – Best for tying two ropes of similar thickness together. It’s commonly used for reefing and furling sails.
- Admiralty Stopper Knot – A stopper knot that prevents a line from running out of a retaining device. Much more reliable than the figure-eight knot.
- Rolling Hitch – Used to attach a rope to a pole or another rope under tension. It’s helpful for taking the load off a jammed winch or making temporary attachments.
- OXO – The standard method for tying a line to a cleat.
- Trucker’s Hitch – Used for securing loads by creating a tight, adjustable line,
- Round Turn and Two Half Hitches – Great for mooring lines, offering a secure way to tie a line to a ring or a post.
- Double Sheet Bend – A variation of the sheet bend, used for the same purpose but provides extra security when dealing with heavy loads or critical attachments.
Each of these knots has its specific application and advantages, making them indispensable tools for sailors to manage sails, secure the boat, and ensure safety on the water.
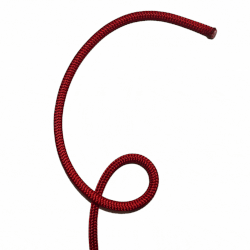
1. Bowline
Use
The bowline is used to form a fixed loop at the end of a rope. It is particularly useful in situations where a non-slip loop is needed. It’s a very reliable knot and in sailing, it’s commonly used to fasten a sheet to the clew of a sail, or attach mooring lines to the dock.
Breaking Strain Reduction
The bowline reduces the breaking strain of the rope by approximately 40% to 60%, depending on the type of rope and how well the knot is tied.
How to Tie:
- Create a small loop (the rabbit hole) in the standing end of the rope.
- Pass the free end (the rabbit) up through the loop from the underside.
- Wrap the free end around the standing part (the rabbit runs around the tree).
- Bring the free end back down through the loop (the rabbit goes back down the hole).
- Tighten the knot by pulling the free end while holding the standing part.
Common Mistakes
- Not tightening the knot sufficiently: This can cause the bowline to slip under load.
- Making the initial loop too small: This makes it difficult to work the rest of the rope through the steps.
- Confusing the direction: For the knot to hold, the free end must come up through the loop, go around the standing part, and then back down through the loop. Reversing these steps can result in an incorrect knot that may slip or fail.
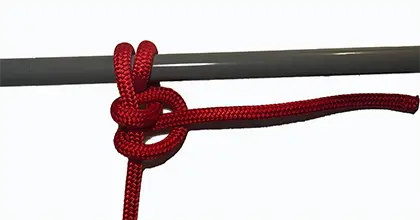
2. Clove Hitch
Use
This knot is primarily employed for attaching ropes to objects like posts, rings, or bars. Its quick application makes it ideal for temporary holds or when an adjustable or easily removable knot is needed. Sailors often use it to secure fenders to a boat, and climbers use it to anchor themselves momentarily.
Breaking Strain Reduction
The clove hitch can reduce the rope’s breaking strain by about 40% to 60%. Its security is highly dependent on the load being steady; dynamic loads can cause it to slip, increasing wear on the rope and potentially reducing its lifespan.
How to Tie:
- Wrap the rope around the object.
- Cross over the standing end to form the first hitch.
- Wrap the rope around the object again and tuck the working end under the last wrap.
- Pull both ends to tighten the knot against the object.
Common Mistakes
- Tying it too loose: This can make the knot slip under varying loads.
- Using it for critical loads without backup: The clove hitch can loosen if the direction of the load changes, making it unreliable as the sole means of securing vital or heavy loads.
- Not monitoring for slippage: Regular checks are necessary to ensure the knot remains tight and secure, especially if the load moves or vibrates.
3. Square Knot (Reef Knot)
Use
Ideal for joining two ropes of similar thickness, the square knot is used for securing packages, bandages, or tying off sail lines. However, it is not recommended for joining ropes under heavy load or critical applications due to its potential to slip when not under constant tension.
Breaking Strain Reduction
Typically, the square knot reduces the rope’s breaking strain by about 45%-55%. While effective for light duties, its impact on rope strength makes it less suitable for heavy or safety-critical loads.
How to Tie:
- Hold the ends of two ropes parallel to each other.
- Cross the right end over the left and tie a simple overhand knot.
- Take what is now the right end, cross it over the left, and tie another overhand knot.
- Pull both ends to tighten the square knot.
Common Mistakes
- Confusing it with a granny knot: Tying both overhands in the same direction results in a less secure granny knot.
- Using it for critical applications: The square knot is not suitable for heavy loads or as a life-saving knot.
- Failing to tighten evenly: Uneven tightening can lead to a weak and unreliable knot.
4. Admiralty Stopper Knot
Use
This stopper knot is particularly used at the end of a line to prevent it from passing through a block or hole. It’s larger and more complex than simple stopper knots like the figure-eight or overhand, providing a secure end on heavier lines or in applications where a significant stop is necessary.
Breaking Strain Reduction
Given its role as a stopper rather than a load-bearing knot, the Admiralty Stopper Knot’s impact on a rope’s breaking strain is less a primary concern. However, like all knots, it does introduce bends and stress concentrations that can affect the rope’s integrity, albeit minimally in this context.
How to Tie:
- Make a single overhand knot near the end of the rope, ensuring enough tail is left for the rest of the knot.
- Create a loop (a bight) with the standing end of the rope above this overhand knot.
- Pass the tail through the loop from front to back.
- Wrap the tail around the standing part and then back through the loop, essentially weaving it through the path formed by the initial overhand knot and the loop.
- Tighten the knot by pulling on the tail while holding the standing part, adjusting as necessary to ensure the knot is compact and the tail is secure.
Common Mistakes
- Not leaving enough tail: Failing to leave a sufficient length of tail beyond the knot can result in the knot coming undone under tension.
- Tightening improperly: Uneven tightening can lead to a less secure knot, which might not serve its purpose effectively.
- Overcomplicating the initial overhand knot: The beauty of the Admiralty Stopper Knot lies in its simplicity and efficiency; overly complicating the first step can make the rest of the knot difficult to tie correctly.
5. Rolling Hitch
Use
This hitch is primarily used to attach a rope to a pole or another rope in a manner that allows it to bear load and slide when necessary. It’s particularly effective for relieving tension on a jammed rope or securing an additional line to take over the load.
Breaking Strain Reduction
The rolling hitch typically has a minimal impact on the breaking strain of a rope, reducing it by about 20% to 30%. Its design focuses on friction and grip rather than tight bends, which helps preserve the rope’s strength.
How to Tie:
- Wrap the working end of your rope around the object or rope twice to create two complete turns.
- Bring the working end over the standing part, then pass it under itself to tie the first half hitch.
- Tie a second half hitch in the same manner to secure the hitch.
- Tighten by pulling on the working end while holding the standing part of the rope.
Common Mistakes
- Not wrapping the rope tightly enough: Loose wraps can cause the hitch to slip under load.
- Incorrectly placing the half hitches: This can compromise the knot’s effectiveness and its ability to hold under tension.
- Using it on too smooth surfaces: The hitch relies on friction; smooth surfaces can reduce its holding power.
6. OXO
Use
The cleat hitch is used to fasten a rope to a cleat, commonly found on docks and vessels. It is ideal for mooring, tying off anchor lines, or securing mooring lines to a dock. The knot can be tied quickly and released easily, even under load.
Breaking Strain Reduction
The cleat hitch is designed more for securing than bearing direct load, so its impact on the rope’s breaking strain is minimal. Properly tied, it allows the rope to distribute stress evenly, maintaining most of the rope’s integrity.
How to Tie:
- Wrap the rope fully around the base of the cleat, then over the top horn.
- Cross over to the opposite horn and wrap under it, forming a figure-eight pattern.
- Repeat the ‘X’
- Wrap the rope one more time full around the base of the cleat.
Common Mistakes
- Over-tightening the initial turns: This can make it difficult to untie the hitch, especially under load.
- Using a locking turn: Adding a locking turn is unnecessary and potentially dangerous.
- Using too many wraps: Excessive wraps can make the hitch bulky and less effective.
7. Trucker’s Hitch
Use
The knot is designed to secure loads by creating a tight, adjustable line, ideal for tying down cargo on trucks, trailers, and boats. Its ability to be easily tightened and released makes it a favorite for securing heavy loads that require adjustment during transport.
Breaking Strain Reduction
While the exact reduction in breaking strain can vary, the Trucker’s Hitch typically impacts the rope’s strength less than complex knots, due to its reliance on loops and tension rather than tight, bending turns.
How to Tie:
- Tie a slip knot or a fixed loop in the middle of the rope.
- Pass the free end around the anchor point and through the loop.
- Use the loop as a pulley to tighten the line.
- Secure the free end with a half hitch or other locking knot.
Common Mistakes
- Failing to properly secure the final hitch: This can result in the load becoming loose during transport.
- Using a slip knot that may come undone: Choosing the right loop or knot for the pulley system is crucial for maintaining tension.
- Not applying enough tension: The effectiveness of the Trucker’s Hitch depends on adequately tightening the line to secure the load.
8. Round Turn and Two Half Hitches
Use
The round turn and two half hitches are used to tie a rope to a post, pole, or other objects. It is especially useful for mooring lines as it can be easily adjusted and is secure under varying loads. The round turn adds friction, increasing the knot’s holding power.
Breaking Strain Reduction
The round turn and two half hitches generally reduce the breaking strain of the rope by about 20% to 30%. The round turn helps to distribute the load more evenly, mitigating some of the strain.
How to Tie:
- Wrap the rope around the object to make a round turn.
- Pass the working end over the standing part and tuck it under itself, forming the first half hitch.
- Repeat the process to create the second half hitch.
- Tighten both half hitches against the round turn to secure the knot.
Common Mistakes
- Not making the round turn correctly: This can reduce the effectiveness of the knot.
- Loosely tying the half hitches: Tight half hitches are crucial for the knot’s security.
- Using it for temporary attachments without checking: Although reliable, it should be monitored for slippage in long-term or critical applications.
9. Double Sheet Bend
Use
The Double Sheet Bend is used to tie two lines together. It is particularly useful when the strength of the connection is paramount, such as in safety applications or when joining ropes of significantly different sizes. It is favored in sailing, climbing, and camping for its enhanced grip and stability, ensuring that ropes remain securely fastened under varying loads.
Breaking Strain Reduction
While the Double Sheet Bend does reduce the breaking strain of the rope to some extent, typically by about 50% to 60%, it is more efficient than many other knots used for joining two ropes. Its design minimizes slippage and distributes stress more evenly, making it a preferred choice for critical applications.
How to Tie:
- Start by making a bight in the thicker rope to form a simple loop.
- Pass the end of the thinner rope through the loop from the back to the front.
- Wrap the thinner rope around both parts of the loop, then bring it back through the loop, parallel to the initial entry, creating the first sheet bend.
- Before tightening, take the end of the thinner rope and make an additional wrap outside the first wraps, following the same path but further out, to add the “double” to the bend.
- Pull all parts tight to secure the knot, ensuring both wraps are snug and parallel.
Common Mistakes
- Not making the additional wrap correctly: The effectiveness of the Double Sheet Bend lies in its second wrap. Incorrectly placing this wrap can significantly reduce the knot’s security.
- Failing to tighten sufficiently: Each part of the knot needs to be pulled tight to ensure that it holds under load. Inadequate tightening can lead to slippage.
- Using it for ropes of the same diameter: While the Double Sheet Bend can be used for ropes of equal thickness, its advantages are most pronounced when connecting ropes of different sizes. In cases where ropes are of similar diameter, other knots may be more suitable.